Roller embossing is a useful starting route for a repeating pattern that must continue along a long belt strap. Plate embossing can suit a defined panel or deliberately positioned motif. The deciding question is whether the finished belt needs continuous texture, a registered design at a particular location, or both. Compare the usable patterned area, repeat direction and cutting layout before choosing the process; neither machine name guarantees a seamless finished belt.
A small texture swatch can look convincing while concealing the hardest development problem: what happens when that design must cover a narrow strap, several belt lengths and a shaped tip. This comparison focuses on those layout decisions. Our embossed belt range covers product directions; here the task is to turn a chosen appearance into a workable pattern arrangement.
What changes between a roller and a plate?
A roller carries the engraved design around a cylindrical surface and transfers it as material moves through the contact zone. A plate applies a flat patterned face over a defined area during a pressing operation. These different contact geometries matter because a long design can be produced through continuous feed or through one or more positioned impressions.
The distinction exists in belt equipment, not only in upholstery finishing. OMAC describes its STP30 as a heated roller machine for leather and synthetic-leather belts, with variable speed, adjustable temperature and a marking roller that can be made to the customer’s design. This is evidence of a process route, not a claim that HongDing uses that model or that its settings suit your material.
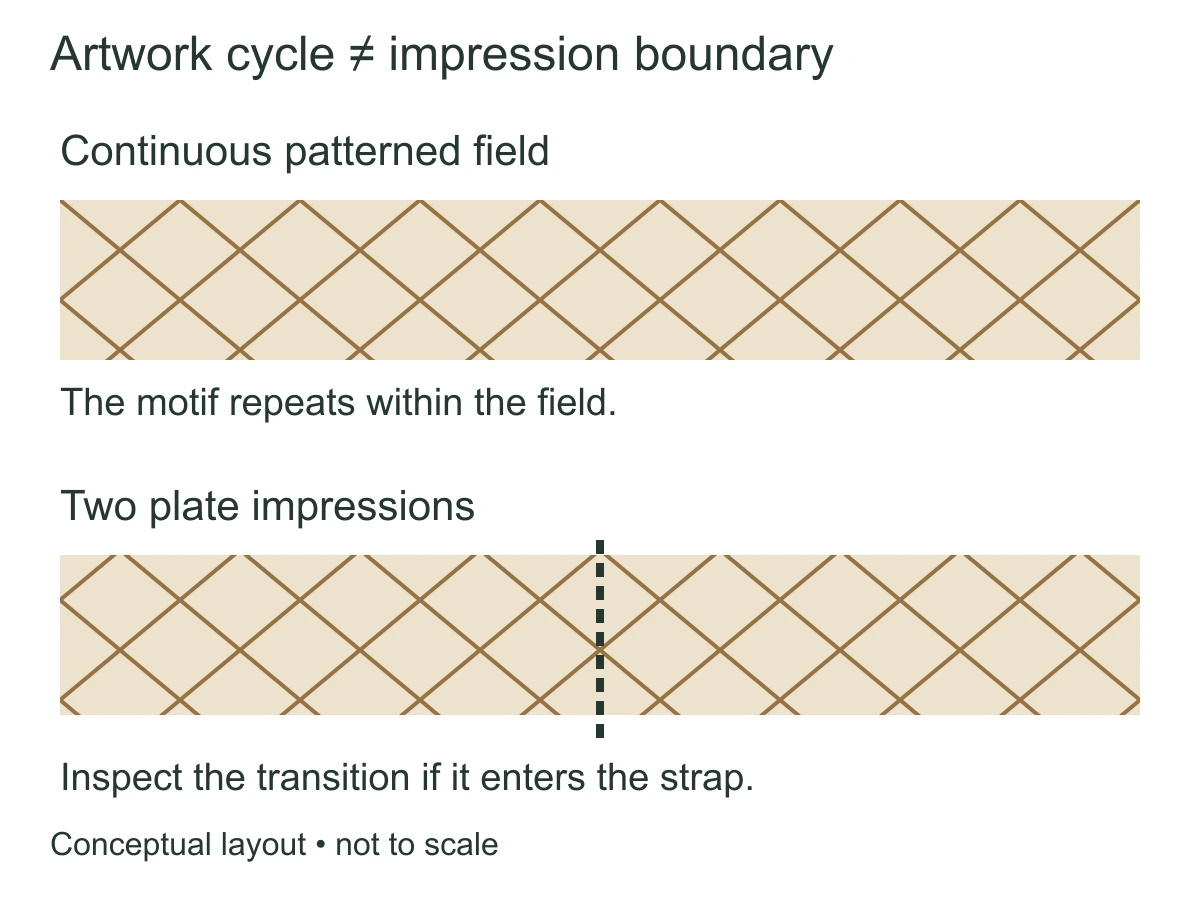
For a buyer, continuous feed is valuable when the design should read as an uninterrupted texture. A flat tool may be useful when a particular motif must occupy a controlled field. However, a repeating roller still repeats its engraved design, and a large plate may contain several repeats within one impression. “Continuous” describes how the work passes through the operation; “repeat” describes how the artwork returns to the same position in its cycle.
Start with the visual requirement. A fine all-over grain can tolerate different starting points between straps if the overall scale and direction remain consistent. A prominent flower, border or central emblem may require a specific position relative to the tip or buckle. Those are different products to approve even when they share a leather article and color.
Separate repeat length, tool size and usable area
Pattern repeat is the distance between equivalent features in the design. Tool size is the physical size of the engraved plate or roller. Usable patterned area is the area from which acceptable parts can actually be cut after allowing for boundaries, transitions and material defects. Treating these three measurements as interchangeable creates avoidable layout errors.
Garrett Leather’s Impress specification lists plate dimensions, embossing area and horizontal and vertical repeats separately. It also explains that its plate process can produce plating marks, overlaps and seams between impressions. Those details belong to that supplier’s particular range; its dimensions and seam intervals are not universal belt specifications.
The practical lesson is to examine a field large enough to contain the relevant boundary. If a sample ends before a plate transition, it cannot show how that transition will look on a long strap. Likewise, a short roller sample may establish texture scale but fail to show a conspicuous recurring feature. Ask for enough patterned length to assess the full visual cycle and the intended cutting route.
Two orientations must also be named. The supplier’s horizontal and vertical directions describe its own patterned field. The belt drawing has a longitudinal direction from buckle to tip and a transverse direction across its width. Mark an arrow on the reference connecting these coordinate systems. Otherwise, two people can approve the same repeat values while imagining the pattern rotated by ninety degrees.
Compare the routes against the same belt requirement
Scroll horizontally on a narrow screen to compare both routes.
| Requirement | Roller route | Plate route |
|---|---|---|
| Long all-over texture | Evaluate continuous feed and the visible artwork cycle. | Evaluate usable field length and any transitions between impressions. |
| Placed dominant motif | Define how the artwork start and final cut position are registered. | Define the motif location within the impression and part outline. |
| Multiple strap widths | Check which lateral section of the pattern each width captures. | Check the strip layout within the approved patterned field. |
| Appearance approval | Compare repeat, direction and definition along the feed. | Compare definition within the field and across any required transitions. |
| Commercial comparison | Include actual tooling, setup, usable output and subsequent operations. | Include tooling, positioning, cutting restrictions and subsequent operations. |
This table identifies issues to resolve, not a ranking. A plate route with an adequately sized acceptable field may avoid a transition on the final part altogether. A roller route with an unsuitable artwork cycle can make an obvious feature recur in an awkward place. Ask to see the proposed route represented on the actual belt outline before accepting a general claim that one process is “better.”
Plan the pattern across narrow and wide straps
A pattern that looks balanced on a broad panel may lose its identity when cut into a skinny belt. The narrow part may retain only a groove, a fragment of a large scale or one side of a flower. Increasing the number of strips cut from a panel does not solve that visual problem. The design may need a smaller motif, a different cutting position or a different pattern for that width.
Use full-size outlines over the pattern rather than judging only from a zoomed photograph. Include the finished edges, not simply the rough strip width. Edge finishing and stitching can occupy part of the visible face, so a motif positioned near the cut edge may look crowded after assembly. A wide belt can have the opposite issue: a strong central design may leave side regions that look unintentionally empty.
There are two useful starting arrangements:
- All-over placement: accept different motif positions while holding the agreed scale, direction and general distribution. This usually offers more layout freedom, provided the resulting differences are visually acceptable.
- Registered placement: locate a selected feature relative to a named point, such as the centerline or tip. This gives a more controlled composition but can restrict which sections of the patterned material are usable.
The choice affects yield because the geometric freedom to nest or shift a part changes. That does not establish a fixed waste percentage. Ask the supplier to evaluate the actual material outline, defect exclusions and pattern placement together. A theoretical grid drawn on a perfect rectangle is not a reliable estimate of cutting yield from real hides.

Choose what stays fixed when the belt length changes
A size range adds a second layout decision. If every size begins with the same motif at the buckle end, the pattern arriving at the tip may differ as length changes. If every tip must end on the same motif, the opposite end may need to shift. Neither arrangement is inherently wrong, but they should not be left to an operator to infer from a single middle-size sample.
Identify which visible landmarks matter most. The buckle fold may conceal some material; the keeper covers another region; the hole field interrupts the pattern; and a pointed tip removes part of the final motif. A large decorative element centered on an unassembled blank can end up hidden or cut through on the completed belt. Review an assembled sample in both open and worn-like arrangements, without treating a staged photograph as a durability test.
For a directional design, specify which way it travels toward the tip. A mirrored pattern and a reversed strap orientation can look similar in isolated photographs but differ in a coordinated collection. When two colorways use separate material runs, keep the same direction convention in their references rather than relying on the photographer’s camera orientation.
A useful sample set includes lengths or widths that expose a different placement problem, not merely several nearly identical examples. For instance, the shortest and longest planned lengths can reveal whether the chosen end alignment changes the appearance elsewhere. Select the actual variants on that basis; there is no universal number of samples that proves every range acceptable.
Pattern continuity does not establish material suitability
Two samples with the same drawing can still feel and behave differently because the base leather, surface finish and processing route differ. The relief is formed in a real material system rather than in an abstract graphic. A sharper-looking impression is therefore not automatically the better belt if it changes the desired hand, distorts the part or produces an unacceptable surface response when the strap bends.
One published example shows why recipes should remain specific. Stahl’s leather-embossing patent describes a leather support with partially cured surface layers and a protective foil during roller embossing. That particular construction is not a description of every embossed belt. Its relevance here is that coating state and construction belong in a process discussion alongside tool shape.
Compare candidate samples on the intended material article and finishing route. If one swatch is a softer, differently finished leather, attributing the entire result to roller versus plate is misleading. Record what changed between samples so that a successful revision can be repeated. Keep material and process changes separable where practical; if several inputs must change together, identify the combination that was actually approved.
For visible stretching or a distorted repeat, distinguish artwork spacing from changes introduced during processing or handling. Compare the unprocessed reference where available, the patterned field and the finished cut part using the same orientation and viewing conditions. An elongated motif alone does not identify a single cause. The manufacturing team needs to examine feed, support, material condition and the relevant setup before prescribing a correction.
Similarly, increasing pressure should not be the default answer to a shallow-looking texture. The apparent depth also depends on lighting and finish contrast, and a process adjustment can affect more than appearance. Agree which feature needs improvement, make a controlled trial and recheck the properties already accepted. The buyer’s role is to define the desired result and unacceptable side effects; the operation-specific settings belong to the qualified production route.
Worked example: one pattern for two belt widths
Suppose a brand wants a broad fashion belt and a narrower companion style with the same geometric embossing. This is an illustrative development scenario, not a HongDing order or test result. The first swatch shows a large repeating diamond pattern that looks attractive across the whole sheet.
Overlaying the two finished strap outlines reveals that the wider style captures complete diamonds while the narrow style shows mostly alternating diagonal fragments. The brand now has a real choice: accept an abstract companion texture, reduce the motif scale for the narrow style, or move to a different coordinated design. Changing from plate to roller alone will not make a large motif fit a smaller visible width.
Next, the proposed plate field is mapped along the longest strap. A transition falls in the exposed front section. The team can investigate a different cutting position, a larger usable field, an intentionally acceptable transition, or a roller route. Each option should be compared with its consequences: usable material, tooling, placement control and resulting appearance. Hiding the transition on the sample without recording the cutting arrangement would leave the production problem unresolved.
Finally, the brand chooses a repeat direction and a tip alignment rule for each width. The revised samples are reviewed after edge work and assembly. This sequence resolves the visual composition before treating a machine choice as final, while still allowing manufacturing feedback to change the layout when a proposed arrangement is impractical.
Carry the approved layout into production
The production reference should connect three things: the material and surface specification, the pattern identity and orientation, and the finished part’s placement rule. A photograph of a single attractive belt is useful but rarely explains all three. Keep the physical master and annotated layout together, including any agreed acceptable variation in motif position or transitions.
At first-off review, compare more than a central texture patch. Look at the full exposed length, both edges, the hole field and the end regions that drove the original choice. During production, compare output after relevant material or setup changes against the same references. If a discrepancy appears, identify the affected pieces and production interval before assuming it applies equally to every carton.
Different patterns call for different acceptance descriptions. An irregular all-over grain may be judged against an approved appearance range, whereas a centered emblem needs a defined location and measurement reference. Numerical tolerances should be agreed for the actual design and measurement method; adding a precise-looking number to an unclear drawing does not create control.
HongDing’s manufacturing coordination connects material and component checks, cutting, construction, assembly and inspection. For an embossed belt program, that supports a discussion of how the surface choice and cutting map will reach the assembled product. The selected embossing equipment, operation location and project-specific limits still need confirmation rather than being inferred from a general capability description.
Bring the pattern and the belt shape together
Share a pattern reference, the intended belt silhouette and any widths or sizes already known. Mark the feature you most want to preserve, such as continuous texture, a centered motif or a particular tip appearance. HongDing can discuss material, layout and sampling questions with you; an early reference image is enough to begin while the remaining specifications are developed.